1. How to register names
2. How to register names in BULK
3. How to transfer names to NamesAreCheap
4. How to transfer names in BULK to NamesAreCheap
5. How to transfer names from NamesAreCheap (OUT)
6. How to request a transfer when your current registrar denies your request
7. How to renew your names
8. How to renew your names in BULK
9. How to merge your names to one account
10. How to retrieve the login and password for your names
11. How to retrieve login
and password for your names, when the admin contact email address is no longer valid
12. How to change the admin, technical, and billing contact information for your names
13. How to change the ownership of your names
14. How to change the ownership of your names in BULK
15. How to change the password for your names
16. How to change the password for your names in BULK
17. How to change the DNS for your names
18. How to change the DNS for your names in BULK
19. How to create nameservers for your names
20. How to add nameservers for your names if you delete them
21. How to point your names to your ISP, via computer, at home or office
22. How to point your names to your hosting company
23. How to activate Advanced Redirection
24. How to create a website for your name, with no banners and no ads - (HOME PAGE)
25. How to forward your name, with your name staying in the browser (CLOAK)
26. How to forward your name, with the name changing to the target URL (REDIRECT)
27. How to forward Email (anyname@yourname.com)
to my existing email address (myname@isp.com)
28. How to modify the A record and MX record for your name
29. How to modify the CNAME for your name
30. How to lock my domain name
31. How to retrieve old domain login and password
32. How does deletion of expired domain name works?
33. How to re-submit a declined transfer request
34. How to get the authorization Code
1. How to register names
-Go to the NamesAreCheap.com main page
-Type the name you wish to register
-Create a new username and password
-Follow instructions
back to top 2. How to register names in BULK
-Go to the Bulk Registration page
-Create username/password (This will be your Domain Login and Password)
-Paste the names you wish to register
-Follow instructions
back to top 3. How to transfer names to NamesAreCheap
-Go to the Transfer Your Name page
-Type the name you wish to transfer
-Create a username and password, or type your existing username/password (Domain Login and Password)
-Follow instructions
back to top 4. How to transfer names in BULK to NamesAreCheap
-Go to the
Bulk Transfer page
-Create a username and password, or type your existing username/password (Domain
Login and Password)
-Paste all names you wish to transfer
-Follow instructions
back to top 5. How to transfer names from NamesAreCheap (OUT)
-Please consult with your future registrar
back to top6. How to request a transfer when your current registrar denies your request
-Fill out our Second Transfer Request Form for another transfer or refund.
-Make sure to enter your order ID, or else your transfer will not be processed
back to top 7. How to renew your names
-Go to the Realtime Renewal page
/ Manual Renewal page
-Enter the name you want to renew,
-Type your username and password (Domain Login and Password)
-Follow instructions
back to top 8. How to renew your names in BULK
-Go to the Renewal page
-Type your username and password (Domain Login and Password)
-Check the box for all the names you want to renew
-Follow instructions
back to top 9. How to merge your names to one account
-Login to the Domain Control Panel
-Type in your NAC passport of the name you want to move
-Click "profile"
-Click "change ownership"
-Type the username, login, and password of the name you want to merge to
-Check the "Move to existing profile" box
-Check the "Move all domains associated with this profile"
-Click "change owner"
back to top 10. How to retrieve the NAC passport
-Go to the Lost login/password
page
-Type your email address or domain name.
-
Your login and password will be emailed to the current Admin Contact listed on your account.
back to top 11. How to retrieve the login and password for your names, when the admin contact email address is no longer valid.
-Please goto http://adminchange.com
back to top
12. How to change the admin, technical, and billing contact information for your name(s)
-Login to the Domain Control Panel
-Click "Admin, Billing, or Technical"
-Update information
-Click "Save Configuration"
back to top13. How to change the ownership of your names
-Login to the Domain Control Panel
-Click "Profile"
-Click "Change Ownership of Domain"
-Type the new "user name"
-Type the new password, then confirm
-Click "change owner"
back to top14. How to change the ownership of your names in BULK
-Go to the Domain Control Panel
-Type your NAC passport
-Check the box to choose names
-Choose "Change information associated with these names" by checking the box
-Click "Next"
-Click "Change the ownership of these domains"
-Click "Next Step"
-Type the new username and password, and confirm password.
-Click "process"
back to top15. How to change the password for your names
-Login to the Domain Control Panel
-Click "Profile"
-Click "Change password"
-Type new password and confirm
-Click "change now"
back to top16. How to change the password for your names in BULK
-Login to the Domain Control Panel
-Click "profile"
-Click "Change password"
-Type new password and confirm
This will change the password of all names associated with this profile.
back to top17. How to change the DNS for your names
-Login to the Domain Control Panel
-Type your Domain Login and Password
-Click "nameservers"
-Change the existing nameserver to yours
-Click "save configuration"
back to top18. How to change the DNS (name server) for your names in BULK
-Go to the
Domain Control Panel
-Type your NAC passport
-Choose the names you want modify by checking the box
-Check "OPTION B: Change General Information Associated with domain(s)" and click next.
-Check "Change the Nameservers for these domains"
-Click "Next step"
-Type "Primary and Secondary nameservers"
-Click "process"
back to top
19. How to create nameservers for your names
NOTE: This procedure requires an IP from your hosting company or ISP.
-Login to the Domain Control Panel
-Type your NAC passport
-Click "nameserver"
-Click at the very bottom of the page: "if you want to create or modify a
nameserver which is based on yourdomain.com "click here"
-Type your server hostname (for example, ns1.yourname.com) and type your server IP address.
-Click "create nameserver"
back to top
20. How to add nameservers for your names if you delete them
-Login to the Domain Control Panel
-Type your Domain Login and Password
-Click "nameserver"
-Enter your Primary nameserver(for example, ns1yourname.com) under "server hostname" box
-Click "add nameserver"
-Click "save configuration"
back to top21. How to point your names to your ISP, via computer, at home or office
NOTE: This procedure requires an IP from your ISP.
NOTE: Advanced Redirection activation required. No.23 needs to be accomplished first
-Go to the Domain Control Panel
-Login, using your NAC passport
-Click "Advanced Redirection"
-Choose "'Option 5"
-View snapshot of the
correct configuration here!
back to top22. How to point your names to your hosting company
NOTE: This procedure requires nameservers from your hosting company.
-Login to the Domain Control Panel
-Type your Domain Login and Password
-Click "nameserver"
-Change the existing Primary and secondary to your hosting company's nameservers
-Click "save configuration"
back to top
23. How to activate Advanced Redirection
-Go to the
Domain Control Panel
-Type your Domain Login and Password
-Choose the names you want to activate
-Check "OPTION C: Activate NamesAreCheap Advanced Redirection"
-Click "next"
-Click "activate"
NOTE: All names will be changed to NamesAreCheap.com redirection DNS
back to top
24. How to create a website for your name, with no banners and no ads - (HOME PAGE)
NOTE: Advanced Redirection activation required No.23 needs to be accomplished first
-Go to the Domain Control Panel
-Type your Domain Login and Password
-Check "OPTION A: Change Advanced Redirection for domain(s)"
-Click "next"
-Choose "Option 4: Homepage"
-Paste your HTML file or type your text inside the indicated box
-Click "process"
back to top25. How to forward your name, with your name staying in the browser (CLOAK)
NOTE: Advanced Redirection activation required. No.23 needs to be accomplished first
-Go to the Domain Control Panel
-Type your Domain Login and Password
-Check "OPTION A: Change Advanced Redirection for domain(s)"
-Click "next"
-Check "Option 3: Cloaked"
-Type the target URL
-Click "process"
back to top26. How to forward your name, with the name changing to the target URL (REDIRECT)
NOTE: Advanced Redirection activation required. No.23 needs to be accomplished first
-Go to the Domain Control Panel
-Type your Domain Login and Password
-Choose names you want to forward
-Check "OPTION A: Change Advanced Redirection for domain(s)"
-Click "next"
-Check "Option 2: Redirection"
-Type the target URL
-Click "process"
back to top27. How to forward Email (anyname@yourname.com) to my existing email address (myname@aol.com)
NOTE: Advanced Redirection activation required. No.23 needs to be accomplished first
-Go to the Domain Control Panel
-Type your Domain Login and Password
-Choose names you want to have active email addresses
-Choose "OPTION A: Change Advanced Redirection for domain(s)"
-Click "next"
-Below the form, check the "E-mail forwarding" box
-Type the email address you want email forwarded to
-Click "process"
back to top28. How to modify the A record and MX record for your name
-Step 1: Make sure the domain is unlocked, instructions here
-Step 2: Login to http://icontrolpanel.com
- it should redirect you to manage.opensrs.net
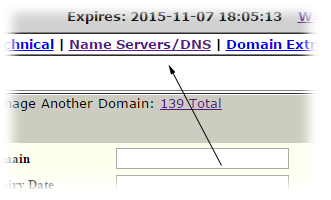
-Step 3: Click Nameservers/DNS (Snapshot below) - If you don't see this feature, please open a ticket and ask our staff to enable this for you (no charge)
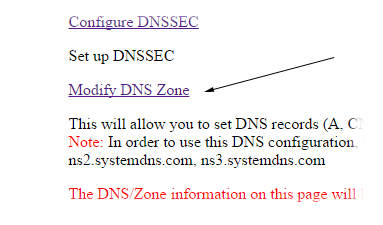
-Step 4: Click Modify DNS Zone (Snapshot below)
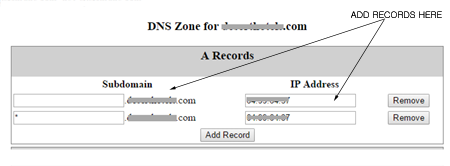
-Step 5: Add A record and IP address
on these fields, further below is where to add the MX records > Click Add Record (Snapshot below)
-Step 6: Scroll down and click Save DNS Zone button
-Step 7: Click Nameservers/DNS
again (link from menu)
-Step 8: Click Manage Name Servers (Snapshot below)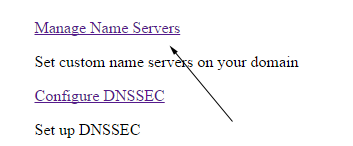
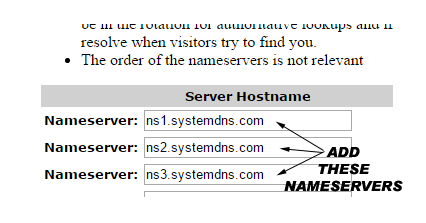
-Step 9: Add the following nameservers: (Snapshot below)
Primary: ns1.systemdns.com
Secondary: ns2.systemdns.com
Tertiary: ns3.systemdns.com
-
-Step 10: Scroll down and click Save Configuration
-You're done. Just wait for the DNS to propagate.
back to top29. How to modify the CNAME for your name
-Follow
instructions 28 and look for the CNAME field.
back to top30. How to lock my domain name
-Go to the Domain Control Panel
-Type your Domain Login and Password
-Click 'Domain Locking'
-Choose 'Enable'
-Click 'Submit'
31. How to retrieve old domain login and password
32. How does deletion of expired domain name works?
33. How to re-submit a declined transfer request
back to top34. How to get the authorization Code
-Go to the Domain Control Panel
-Type your Domain Login and Password
-Click 'Domain Locking'
-Choose 'Disable'
-Click 'Submit'
-Click 'Domain Extras'
-Inside this page you will see the authorization codeback to top
|

